Nail Passion

Nail Art is my passion! This blog is all about nails :) I wanted to share my passion with others and be able to connect and follow others who share the same interests! I hope you enjoy my blog :) Feel free to comment, like, share and/or give feedback. (You can also find me on Facebook and Pinterest).

Sunday, September 27, 2015

31 DAY NAIL ART CHALLENGE 2015 (DAYS 11-20)

Ok! I'm back with 10 more designs from the 31 Day Challenge :) I did fall behind a little bit, but I'm slowly catching myself back up (because I am determined to finish it :P). So let's jump in, shall we?

DAY 11 - POLKA DOTS


The colors I chose for this design were China Glaze Man Hunt and I'd Melt for You.

DAY 12 - STRIPES


What I had in mind for this design didn't quite turn out, so I decided to keep it simple with one vertical stripe separating the 2 colors. The polishes used for this design were Sinful Colors Tempest, Pink Poppy's and China Glaze Passion.

DAY 13 - ANIMAL PRINT


I really wanted to keep this design kind of simple and classic looking. It's been awhile since I had done any animal print, and I didn't want to get to extravagant. The polishes I used were Wet N Wild LAC - My Mani?, Distressed to Impress and black acrylic paint.

If you would like to see a Video Tutorial for this design, you can check it out here.

DAY 14 - FLOWERS


I can not tell you guys how much I LOVE THIS DESIGN!!! :D I could almost cry from disappointment that I couldn't wear it longer...but I do plan on doing it again, because I want to do a Tutorial for you guys ;)

The colors I used are nameless. They are 2 grey polishes from Forever 21. The stamp I used is from Bunny Nails plate BuNa-B, and the dried flowers are from the Born Pretty Store. I also decided for a more vintage look by finishing the design with a matte topcoat.

DAY 15 - DELICATE PRINT


I typically kind of hate this day in the challenge because I always end up thinking of the same thing. Lace. Because it's delicate...but this year I decided to think out of the box...well, not really. I just Googled delicate and a picture of a Dandelion popped up, so I figured I'd try it out. I don't love the way it turned out, mainly because the black stands out too much...but it did grow on me a little.

The color I chose as the base was Everlasting Meadow by Royal Polish, and the actual design was done with acrylic paint.
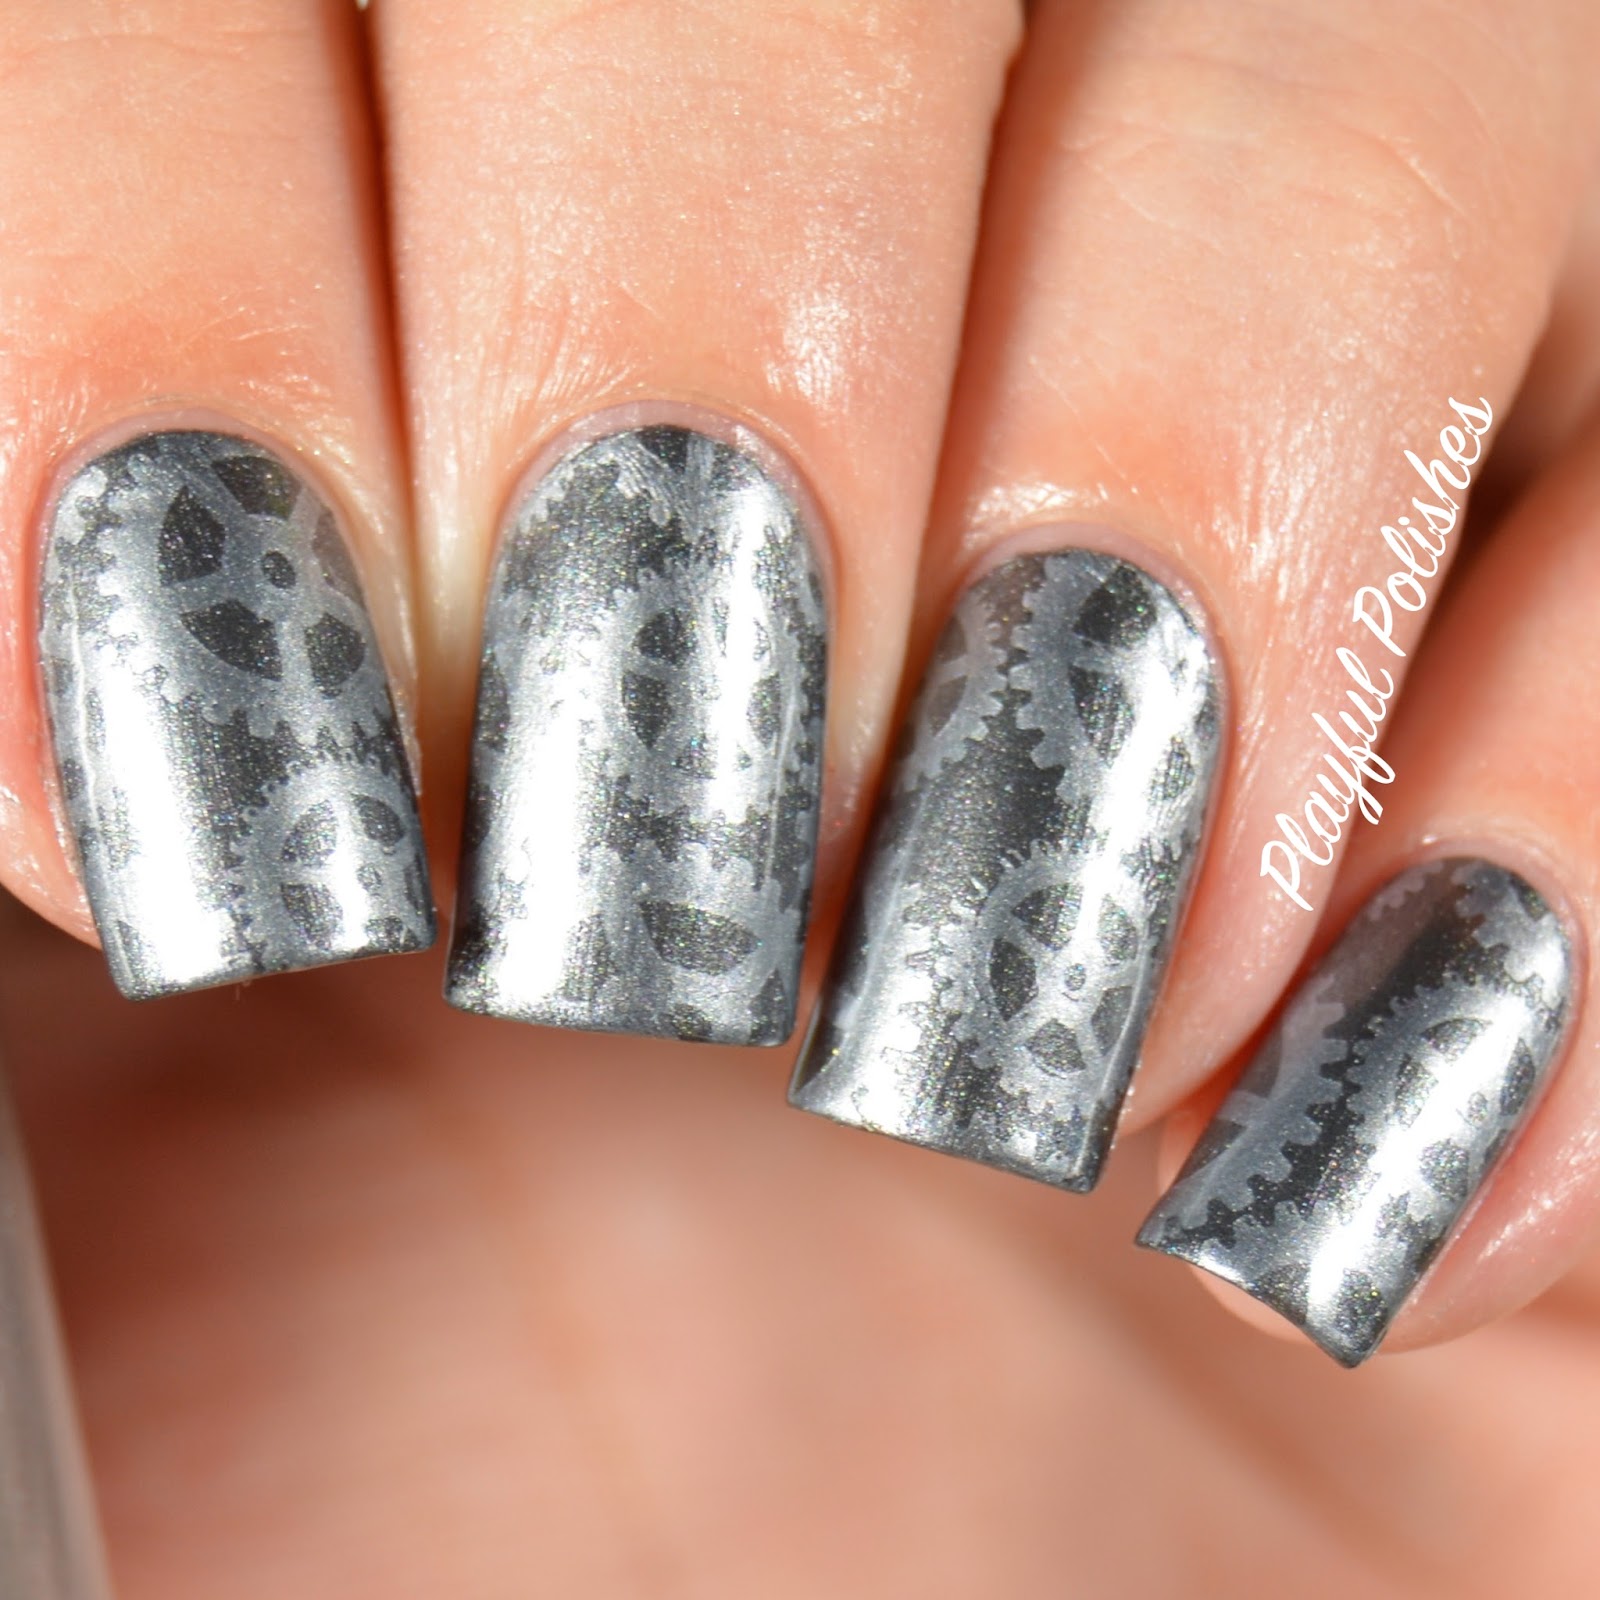
DAY 16 - GEOMETRIC


Ok, so I have to tell you guys that I am disappointed that this day in the challenge was changed from the previous years. In previous years this day was 'Tribal Print'...and I get that you can still do Tribal Print for Geometric nails...but it just isn't the same. Tell me I'm lame for thinking that, idc...but it's whatever now. I did like how this design turned out though :)

Polishes used were China Glaze For Audrey, Shocking Pink, Funky Fingers Gesso and an unnamed grey from Forever 21. I also finished off this design with a matte topcoat.

DAY 17 - GLITTER


Who doesn't love glitter!? ...well I didn't for some time. Mainly because it's a bitch to take off. But I've learned to deal with that because you can't not use glitter polishes!

For this design I used Funky Fingers Gesso and China Glaze Don't Be a Flake. If you would like to see how I created this design, feel free to check out my Video Tutorial here.

DAY 18 - HALF MOONS


I went shopping with my mom last weekend and found this Stunning polish by Essie and could not resist buying it! Especially since I was at TJ Maxx and it was the discounted price from what I would pay at Ulta or pretty much anywhere else.

The polish is called Wrapped in Rubies. I also applied China Glaze Passion over the top with a stamp from Pueen25.

DAY 19 - GALAXY NAILS


Let me just tell you how this design only took me 30 minutes! For those of you who have never tried a Galaxy design because you may think it's "too complicated" or "too much work", you're wrong (respectfully). You have to give Galaxy nails a try! They are so freakin easy and it's almost impossible to mess them up!

The colors I used were Funky Fingers Black Knight and Jior Couture Bonfire, Migration, Foliage and Scenic. I also used white acrylic for the stars...and once I topcoat this design those Jior Couture colors just sparkled!! OMG I wish you guys would have seen it! ;)

DAY 20 - WATERMARBLE


I kind of almost dread this day during the challenge because it really is a challenge for me to water marble. It's always frustrating and I never get it right on my first, second and most times even third try...but I finally did something right. I don't think this design turned out "perfect" (I have very high standards for myself :P) but it's the most perfect water marble design I've done yet, so I'm happy with it.

The colors I chose were all by Liquid Sky Lacquer, The Passion Club, Meet Cha at the Pink Kitty and No Strippers, Please. I also used a base of Gesso by Funky Fingers.

If you missed Days 1-10 you can see them here. Thanks for making it to the end of this post, I know it was long, but I hope you enjoyed it! :D

Saturday, September 26, 2015

JIOR COUTURE 'AS A MATTER OF FALL' COLLECTION SWATCH & REVIEW

Good morning! I'm very excited to be sharing some STUNNING polishes with you guys today! This is Jior Couture's 'As a MATTEr of Fall' Fall Collection. All of these polishes have shimmer and flakies...and as you can probably guess by the name of the collection, they have a matte finish.


**These polishes were sent to me for review. Please see my Disclosure Policy listed in the tabs above.**

Up first is Harvest. Harvest  is a beautiful lime green/mustard yellow polish, with shimmer and flakies. The formula for this one was a little thick (Sacha from Jior, emailed me and mentioned this could have happened, so I was prepared for it. Too much air got into the polish when they were packing them.) I just added a little nail polish thinner and it was as good as new :) 


One coat was a little sheer and slightly patchy, but once the second coat was applied the polish was completely opaque and self leveled.


I wanted to see what they would look like with topcoat so here you can see 2 fingers with Seche Vite topcoat. 


Bonfire is a beautiful, brick red with shimmer and flakies. This color made me melt :P I LOVE this shade of red! I think it looks great with my skin tone.


Again, I applied 1 coat which was slightly sheer, but by the second coat the nail was completely covered and the polish self leveled.


Here is Bonfire with topcoat...isn't it Gorgeous!?


Foliage is a stunning forest green with shimmer and flakies. I was totally gaga for this color! I normally don't really like or really dislike greens, I've typically been pretty neutral, but I REALLY LOVE this shade of green!


Again, I applied one sheer coat and then a second to completely coat the nail. For this one though, I decided to add a third coat, just to add more shimmer and flakies.


Here's the polish with topcoat (Does it make you think of Christmas? ...or is it just me?).


This deep purple polish is absolutely breath taking! This is Migration. I swatched this color too fast to really take in the beauty of it while I was wearing it. But the photos are so pretty! I'll definitely be wearing this one again :)


Again, I applied the first coat, and then completed the swatch with a second coat.


Here's the topcoat. <3 <3


Frost is a beautiful, gunmetal grey. This polish was one of those ones that at first I overlooked, like "oh it's a grey polish, ok nothing super special". But boy was I wrong! This grey with the flakies is mesmerizing!


I applied my first coat and then halfway through my second coat I realized I wasn't getting many of the flakies, so I shook the bottle and applied a third coat and I am so glad I did! You don't really notice how much the flakies enhance this polish until you realize you're not actually getting them onto the nail. Don't make that mistake if you buy these polishes for yourself! YOU WANT THE FLAKIES!! :P


This polish with topcoat is to die for! (Insert googly eyes here).


Last up is Scenic, a beautiful deep blue, shimmer flakie polish. You guys know I love my blues :D


I applied my 2 coats and then decided I wanted more flakies, so I added a third coat.


...And here's the topcoat, which pretty much knocked me out of my chair! LOL!!


I can't even put into words how IN LOVE with this Collection I am...even if I had not swatched these myself, all of the other swatches I've seen of them has just had me gaga. I have never been so IN LOVE with an entire collection before. And I'm slightly sad to admit this, for how much I love matte polishes, I almost liked these better with topcoat! 
Both finishes are absolutely perfect though ;)

So, do yourself a favor and get your hands on them! ...Well technically you can't atm because it's all sold out. But follow Jior Couture on Facebook and Instagram to keep up to date on when she'll have the entire collection restocked! Or if you only want a few of the polishes (which you'd be crazy not to get all of them, but who am I to judge? ;P), you can click the link below and buy the individual polishes now.


Sunday, September 13, 2015

31 DAY NAIL ART CHALLENGE 2015 (DAYS 1-10)

Hello :) I hope you all are having a nice, relaxing weekend. 

If you've been following me on any of my Social Media sites over the last 3 years you may remember that each September I participate in the 31 Day Nail Art Challenge. 

I am doing it again this year, but instead of posting each design individually I will be posting them in 3 different posts (10 designs at a time). It's quite difficult to do my nails everyday, let alone take photos, edit them, add them to all of my Social Media sites and then write up a Blog post...so this year I'm doing it a bit different and I'd love to know whether you like it this way, or the way I've previously done it...so please feel free to give me some feedback :)

DAY 1 - RED NAILS


I kept this design super simple and used one of my new polish from LondonTown. You can see the plain swatch of this beautiful polish called Lady Luck in my previous Blog posts, here. I stamped over the top with Funky Fingers Black Knight and BornPrettyStore Plate BPL-024. I liked the matte look of the black stamp against the shiny red polish so much that I decided not to topcoat the design.

DAY 2 - ORANGE NAILS


This design was inspired by @thenailpolishchallenge. I have never done an Ikat design before this, but always wanted to...so I went searching for a design I liked, and then made it my own :)
The colors I used were Essie Fear or Desire, OPI Don't Bossa Nova Me Around and black and white acrylic paint.

DAY 3 - YELLOW NAILS


I love yellow and grey together! So for this design I kept it simple using China Glaze Happy Go Lucky and OPI Suzi Takes the Wheel, along with some Palm Tree Stickers I received from the BornPrettyStore.

DAY 4 - GREEN NAILS


I'm not sure if this is a design that is also considered Ikat? but I've seen it a few different times and decided to give it a try. The 2 green polishes I used were Everlasting Meadow by Royal Polish and The Jungle Look by Ulta. The white was painted on using watered down acrylic paint.

DAY 5 - BLUE NAILS


I have NEVER been more IN LOVE with a design than I am with this one!! <3 I was inspired by a design done by +LemmingsPolish. She created a design similar with multiple colors and it is by far my most favorite Nail design ever!! I recreated it with the only (similar) glitter polish I had, free handed the scales with white acrylic paint and then placed all of the charms where I wanted. The glitter polish I used is by Julep called Carly, and I applied a base color underneath by Royal Polish called Robin's Egg.

DAY 6 - VIOLET NAILS


I realize this design is more white than purple, but while I was playing around with different stamping designs I came up with this beauty and couldn't not do it ;) I applied Fancy Gloss Frozen Berries over each nail and then stamped the image with Funky Fingers Gesso and BornPrettyStore plate BPL-024.

DAY 7 - BLACK & WHITE NAILS


I created this design a few days before the 31DC started, but decided to save it because I knew there was a day for Black & White Nails. I used Funky Fingers Black Knight, Lace Floral Stickers I received last year from the BornPrettyStore (which I also used in last years 31 Day Challenge, see that design here. It was day 26) and Pearls from Ebay. I decided I really wanted more of a Vintage look so I finished it off with a matte topcoat.

DAY 8 - METALLIC NAILS


I've never been a fan of this day in the 31DC, it always stresses me out for some reason, so I kept this design simple using 2 different silver polishes from Bundle Monster and a stamp from BornPrettyStore, BPL-022.

DAY 9 - RAINBOW NAILS


RAINBOW!! :D How can you look at this and not feel happy? I used quite a few colors for this design...as you can already tell ;P I started with Funky Fingers Gesso then applied all of my colors to my stamping plate, which was Winstonia plate W203. The colors I stamped with are all from Liquid Sky Lacquer, Meet Cha at the Pink Kitty, Pass the Salsa, CAUTION: Party in Progress, Private Charter and The Passion Club.

DAY 10 - GRADIENT NAILS


 Surprisingly, for such a simple design, this is now my most liked design on both FB and IG. I wanted to keep it subtle, but it didn't quite feel finished until I added China Glaze Fairy Dust. Fairy Dust can literally enhance any design! The 3 colors I used for the gradient are also from my previous post (see here), LondonTown Murray Me, The Full Monty and Mauve Over.

I hope you guys enjoyed this post and look forward to more!

Have a great night! :)